Step by step property cleaning is the process of systematically cleaning each area of a home or property in a logical order to maximize thoroughness and cut wasted effort. Professional cleaners call this method “systematic cleaning” or “sequence cleaning,” and it is the standard approach used by property managers, Airbnb hosts, and residential cleaning crews across Tampa Bay. The difference between a spotless property and a half-clean one almost always comes down to order and preparation. This guide walks you through every phase, from gathering the right supplies to tackling each room in sequence, so you can maintain your property without burning out or missing critical spots.
What essential tools and supplies do you need for efficient property cleaning?
The right supplies make or break your cleaning session before you scrub a single surface. Showing up without the correct tools means doubling back, improvising, and wasting time. Gather everything before you start.
The core toolkit
Every effective property cleaning kit includes these items:
- Microfiber cloths (at least 6–8): Use separate cloths for bathrooms, kitchens, and general surfaces to avoid cross-contamination.
- Vacuum cleaner with attachments: A model with a crevice tool and upholstery brush handles floors, baseboards, and furniture.
- Mop and bucket: A flat microfiber mop works better than a string mop on hard floors because it picks up fine dust instead of pushing it around.
- Scrub brushes (stiff and soft): Stiff brushes handle grout and tile; soft brushes work on delicate surfaces.
- Spray bottles: Fill with your own solutions to control concentration and avoid waste.
- Extension duster: Reaches ceiling fans, crown molding, and light fixtures without a ladder.
Cleaning products that actually work
You do not need a cabinet full of specialty products. Three core solutions cover most surfaces:
| Product | Best Use | Notes |
|---|---|---|
| White vinegar (diluted) | Glass, tile, general surfaces | Mix 1 part vinegar to 1 part water |
| Baking soda paste | Ovens, grout, sinks | Mix with water to form a thick paste |
| EPA-registered disinfectant | Bathrooms, high-touch surfaces | Follow label contact time exactly |
| Dish soap solution | Counters, stovetops, cabinets | A few drops in warm water |
| Microfiber-safe floor cleaner | Hard floors | Avoid bleach-based products on sealed wood |
Following manufacturers’ directions on product labels prevents surface damage and keeps you safe. That one habit alone saves homeowners from costly mistakes like stripping a stone countertop with the wrong acid-based cleaner.
Pro Tip: Organize your supplies in a caddy or bucket before you start. Carry it room to room so you never walk back to the kitchen for a forgotten cloth.
Store all products in a locked cabinet if children or pets are present. Never mix bleach and ammonia-based cleaners. The reaction produces toxic fumes.
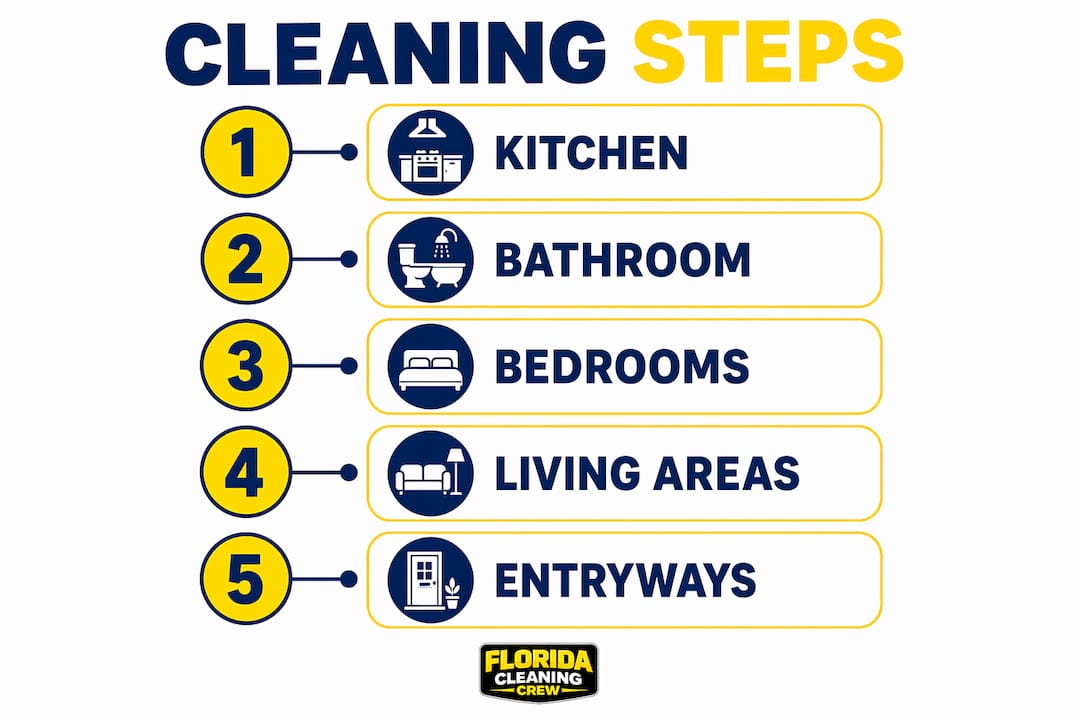
How to clean your property step by step: room by room cleaning guide
Systematic cleaning, top-down and one room at a time, is more time-efficient than moving randomly through a property. It reduces supply use, prevents re-soiling clean areas, and gives you a clear stopping point. Here is the proven sequence.
Step 1: Start with the kitchen (allow 3–4 hours for deep cleaning)
Starting with the kitchen leverages your energy when it is highest and tackles the most labor-intensive room first. The kitchen also has the longest dwell times, meaning you apply a cleaner, let it sit, and clean something else while it works.
- Clear all counters and remove items from the stovetop.
- Apply a baking soda paste to the oven interior and let it sit for at least 30 minutes. Baking soda paste overnight removes stubborn oven grime without harsh chemicals.
- Wipe down cabinet fronts with a dish soap solution, working top to bottom.
- Clean the stovetop, removing grates and soaking them in hot soapy water.
- Wipe the inside of the microwave with a damp cloth after steaming it with a bowl of water and lemon juice for two minutes.
- Run a vinegar cycle through the dishwasher to remove hidden grime and odors. Place a cup of white vinegar on the top rack and run a hot cycle.
- Wipe down the refrigerator interior, discarding expired food first.
- Clean counters, then the sink, then the faucet.
- Sweep, then mop the floor last.
Pro Tip: Pull the refrigerator away from the wall every few months and vacuum the coils. Dusty coils make the fridge work harder and shorten its lifespan.
Step 2: Bathrooms (allow 2–2.5 hours for deep cleaning)
Bathrooms carry the highest germ load in any property. Clean them second while your energy is still strong.
- Apply toilet bowl cleaner inside the bowl and let it dwell while you clean the rest of the room.
- Spray the shower walls and tub with a disinfectant or vinegar solution. Let it sit for five minutes.
- Wipe down the mirror with a microfiber cloth and glass cleaner.
- Clean the vanity, faucet, and sink.
- Scrub the shower walls and tub, paying attention to grout lines.
- Scrub and flush the toilet, including the base and behind the tank.
- Wipe baseboards and the outside of cabinets.
- Sweep, then mop the floor, working from the farthest corner toward the door.
Clean from the farthest corner to the exit to avoid tracking dirt onto freshly cleaned floors. This rule applies to every room, not just bathrooms.
Step 3: Bedrooms (allow 2–3 hours for deep cleaning)
Bedrooms accumulate dust faster than most homeowners realize, especially under beds and on ceiling fans.
- Strip and launder all bedding. Start the wash cycle before you clean so it runs while you work.
- Use an extension duster on ceiling fans. Slide a pillowcase over each fan blade and pull it back to trap dust inside the case instead of scattering it across the room. Using a pillowcase on fan blades is one of the most effective dust-control tricks available.
- Dust shelves, nightstands, and dressers from top to bottom.
- Wipe down light switches and door handles with a disinfectant wipe.
- Vacuum the mattress surface and flip or rotate it if needed.
- Vacuum the floor, including under the bed and in closet corners.
- Mop hard floors or spot-clean carpet stains.
Step 4: Living areas and common spaces
Living rooms and hallways get heavy foot traffic but are often cleaned last, which is the right call because they connect all other rooms.
- Dust ceiling fans, light fixtures, and crown molding first.
- Wipe down all horizontal surfaces: shelves, TV stands, coffee tables.
- Clean windows and window sills with a glass cleaner and microfiber cloth.
- Vacuum upholstered furniture, including cushions and under the cushions.
- Vacuum the floor, then mop hard surfaces.
Pro Tip: For Tampa Bay homes near the coast, salt air deposits on windows and screens faster than inland properties. Wipe window tracks with a damp cloth every two weeks to prevent corrosion.
Step 5: Entryways and laundry areas
Entryways are the first thing guests and tenants see. Laundry rooms are often skipped entirely.
- Wipe down the front door, door handle, and light switch.
- Sweep and mop the entryway floor.
- Clean the washer drum with a washing machine cleaner tablet or a hot cycle with baking soda.
- Wipe down the dryer interior and clean the lint trap housing with a vacuum attachment.
| Room | Deep clean time | Key focus areas |
|---|---|---|
| Kitchen | 3–4 hours | Oven, appliances, grout, under sink |
| Bathrooms | 2–2.5 hours | Grout, toilet base, shower caulk |
| Bedrooms | 2–3 hours | Under bed, fan blades, mattress |
| Living areas | 1–2 hours | Upholstery, windows, baseboards |
| Entryway and laundry | 30–60 minutes | Door, drum, lint trap |
Deep cleaning an average home takes 2–3 full weekends when done thoroughly. That estimate helps homeowners and property managers plan realistically instead of underestimating the job.
How can homeowners and property managers maintain cleanliness with recurring schedules?
Consistent maintenance prevents the need for exhausting deep cleaning sessions. A one-room-a-day schedule helps most homes with 5–7 rooms stay clean throughout the week without any single session feeling overwhelming. The logic is simple: 20–30 minutes of focused cleaning each day beats a 6-hour Saturday marathon every time.
Building a weekly maintenance routine
A practical weekly schedule for a standard home looks like this:
- Monday: Kitchen wipe-down, stovetop, and sink
- Tuesday: Bathrooms (quick scrub, toilet, mirror)
- Wednesday: Bedrooms (dust, vacuum, change linens)
- Thursday: Living areas (dust, vacuum, spot-clean)
- Friday: Entryway, laundry room, and floors throughout
- Saturday: Catch-up tasks, outdoor areas, or windows
- Sunday: Rest or tackle one overlooked area
This structure keeps the routine home cleaning manageable for busy households. Property managers overseeing multiple units in St. Petersburg or Clearwater can assign this schedule to each unit on a rotating basis.
Deep cleaning vs. regular maintenance
Deep cleaning and regular maintenance serve different purposes. Regular maintenance prevents buildup. Deep cleaning removes what maintenance misses over time. Deep cleaning targets areas like inside appliances, behind furniture, grout lines, and air vents. Regular maintenance using a one-room-a-day approach sustains property quality and reduces the labor required for each deep clean session.
Property managers benefit from scheduling HVAC filter checks alongside deep cleaning cycles. Dirty filters push dust back into rooms you just cleaned. You can schedule HVAC cleaning on the same day as a deep clean to get the full benefit of both.
Pro Tip: For rental properties, photograph every room before and after each cleaning session. Documenting cleanliness with photographs prevents security deposit disputes and protects you legally during tenant transitions.
Using a property cleaning checklist
A written checklist is the single most underused tool in property maintenance. It removes guesswork, speeds up training for new cleaners, and creates accountability. Your checklist should include every room, every surface category (floors, walls, fixtures, appliances), and a sign-off column. For landlords managing turnover in Tampa Bay, a detailed checklist also serves as documentation during move-out inspections. See the move-out cleaning checklist used by professional crews for a proven template.
What common mistakes should be avoided in step-by-step property cleaning?
Most cleaning errors fall into two categories: wrong order and wrong product. Both waste time and can damage surfaces.
Mistakes that cost you time and money
- Cleaning floors before dusting: Dust falls from shelves and fans onto your freshly mopped floor. Always dust top to bottom before touching the floor.
- Skipping dwell time: Spraying a surface and wiping it immediately reduces effectiveness. Allowing cleaning solutions to dwell improves stain removal and reduces scrubbing effort.
- Using the wrong product on delicate surfaces: Bleach damages grout sealant over time. Acidic cleaners like undiluted vinegar etch natural stone like marble and granite. Always check the surface type before applying any product.
- Ignoring hidden areas: Behind the refrigerator, inside the dishwasher filter, under the stove drawer, and inside window tracks are the spots that accumulate the most grime and the fewest cleaning visits.
- Reusing dirty cloths: A dirty microfiber cloth spreads bacteria instead of removing it. Use a fresh cloth for each room or surface category.
- Rushing the bathroom: Bathrooms need full dwell time on the toilet, shower, and sink. Cutting this short leaves pathogens behind.
“Deep cleaning should be viewed not just as a chore but as a property management risk mitigation strategy that safeguards revenue and tenant relations.” — Amazing Maids, Property Turnover Cleaning Checklist
When to call a professional
Some situations go beyond DIY capability. Mold behind walls, heavily soiled carpets, post-construction debris, and move-out cleaning for long-term tenants all benefit from professional attention. Property managers in Tampa, Clearwater, and St. Petersburg who handle multiple units find that professional crews complete a full turnover clean faster and more consistently than in-house staff. If a property has not been deep cleaned in over six months, a professional deep cleaning service resets the baseline so your maintenance schedule actually works.
Key Takeaways
A systematic, top-to-bottom, room-by-room cleaning sequence is the most effective method for maintaining property cleanliness, reducing labor, and preventing costly buildup over time.
| Point | Details |
|---|---|
| Start with the kitchen | Tackle the hardest room first when energy is highest and use dwell time to work efficiently. |
| Clean top to bottom | Always dust ceilings and fans before vacuuming or mopping to avoid re-soiling clean floors. |
| Use a daily schedule | A one-room-a-day routine keeps properties consistently clean without exhausting deep clean sessions. |
| Document every clean | Photograph rooms before and after cleaning to protect against disputes in rental properties. |
| Match product to surface | Using the wrong cleaner damages surfaces. Check material type before applying any solution. |
Why I think most homeowners are cleaning in the wrong order
After years of working with property managers and homeowners across the Tampa Bay area, the single most common mistake I see is starting with the floors. It feels satisfying to mop a floor first. The room looks clean immediately. But within 20 minutes of dusting the shelves and wiping the ceiling fan, that floor is covered in debris again. The top-to-bottom rule is not a preference. It is the only sequence that works.
The second thing I have noticed is that people underestimate dwell time. They spray a product and wipe it off in 10 seconds. Most disinfectants require 30–60 seconds of contact time to actually kill bacteria. Most oven cleaners need 20–30 minutes. Skipping dwell time means you are doing the physical work of cleaning without getting the chemical benefit. You end up scrubbing harder than you need to, and the surface is not actually sanitized.
The third insight that most guides skip: cleaning is a risk management tool, not just a comfort preference. For property managers in Tampa, a poorly documented cleaning between tenants can cost thousands in deposit disputes. For Airbnb hosts in Clearwater, a single bad review about cleanliness can tank your booking rate for months. A written property cleaning checklist, combined with before-and-after photos, is the cheapest insurance policy available. I have seen landlords avoid small claims court simply because they had timestamped photos of a clean unit. That is the real value of a systematic approach.
— Matt
How Floridacc helps Tampa Bay homeowners and property managers stay ahead
Keeping a property consistently clean takes time, the right products, and a reliable system. Floridacc provides exactly that for homeowners, landlords, and property managers across Tampa, Clearwater, and St. Petersburg.

Floridacc’s residential cleaning services are built around the same room-by-room, top-to-bottom method described in this guide. Every visit follows a documented checklist, uses eco-friendly products, and is backed by a satisfaction guarantee. Whether you need a one-time deep clean to reset your property or a recurring maintenance schedule to stay ahead of buildup, Floridacc’s licensed and insured team handles it. Request a free estimate at floridacc.com and get a cleaning plan tailored to your property.
FAQ
What is the correct order for cleaning a property room by room?
Start with the kitchen, then bathrooms, bedrooms, living areas, and finally entryways. Always clean top to bottom within each room before moving to the floors.
How long does a full deep clean of a home take?
Deep cleaning an average home takes 2–3 full weekends. Kitchens require 3–4 hours, bathrooms 2–2.5 hours, and bedrooms 2–3 hours each.
What is the most common mistake in step-by-step property cleaning?
Cleaning floors before dusting is the most common error. Dust from shelves, fans, and surfaces falls onto freshly cleaned floors, forcing you to clean them twice.
How often should a property be deep cleaned vs. maintained weekly?
Weekly maintenance prevents buildup on surfaces. A full deep clean is recommended every 3–6 months, or between tenant turnovers for rental properties.
Do I need professional cleaning or can I do it myself?
Most regular maintenance is manageable as a DIY task. Post-tenancy turnover, mold remediation, and properties not cleaned in over six months benefit from professional service to reset the baseline.