
Knowing how to clean after tenants move out is one of the most overlooked skills in property management — and one of the most expensive to get wrong. A unit that looks clean on the surface can still fail inspection if grease is baked onto the oven hood, mold is hiding behind the toilet, or carpet stains were never properly treated. Whether you manage one rental in Tampa or a portfolio across St. Petersburg and Clearwater, the gap between a surface wipe-down and a true move-out clean can mean the difference between a quick re-lease and weeks of vacancy.
Table of Contents
- Key takeaways
- How to clean after tenants move out: getting prepared first
- The step-by-step move-out cleaning method
- Inspection-focused priorities and problem areas
- Documentation and verification after cleaning
- Troubleshooting common move-out cleaning challenges
- My honest take on move-out cleaning after 15 years
- Let Floridacc handle your next move-out clean
- FAQ
Key takeaways
| Point | Details |
|---|---|
| Clean top to bottom | Always start with fixtures and ceilings, then work down to floors to avoid spreading dust to cleaned surfaces. |
| Kitchens and bathrooms first | These two areas receive the most scrutiny during inspections and cause the most deposit deductions. |
| Document everything | Timestamped photos taken after cleaning are your best protection against tenant disputes. |
| Schedule cleaning early | Book professional services 2 to 3 weeks before the move-out date to guarantee availability. |
| Empty the unit first | Cleaning should only begin after all furniture and personal items are fully removed from the space. |
How to clean after tenants move out: getting prepared first
Jumping straight into scrubbing without preparation is how landlords end up missing spots, running out of supplies, or cleaning the same area twice. A solid prep routine saves you hours on the actual cleaning day.
Supplies you’ll need on hand
Before you set foot in the unit, gather these supplies:
- Heavy-duty degreaser for kitchen surfaces and range hoods
- Disinfectant spray and bathroom-specific cleaner for mold and mildew
- Baking soda and white vinegar for natural stain treatment
- Microfiber cloths in multiple colors (to avoid cross-contamination between bathroom and kitchen)
- A stiff-bristled grout brush and a wet pumice stone for hard water stains
- A commercial-grade vacuum with attachments for vents, drawers, and upholstery
- Mop and bucket, trash bags, and a stepladder for ceiling fixtures
- Rubber gloves, eye protection, and knee pads for extended scrubbing sessions
If you’re working in Tampa Bay, local hardware stores like Home Depot on Dale Mabry or Ace Hardware locations across Hillsborough County carry most of these. Keep an organized kit so you’re not scrambling between rooms mid-clean.
Timing and unit preparation
Schedule cleaning only after all furniture and belongings have been completely removed. Cleaning around furniture means missing the walls behind dressers, the floors under beds, and the dust that collects in corners. You will also need to verify that the tenant has removed all trash and personal items before any work begins. Bins, closets, and storage areas should all be empty.
Pro Tip: If end-of-month move-outs are common in your portfolio, book your cleaning team 2 to 3 weeks in advance. High-demand periods fill fast, particularly during the summer rental rush in Tampa Bay.
For a broader look at improving cleaning routines for Tampa properties, it helps to think of preparation as a separate task, not just the first step.
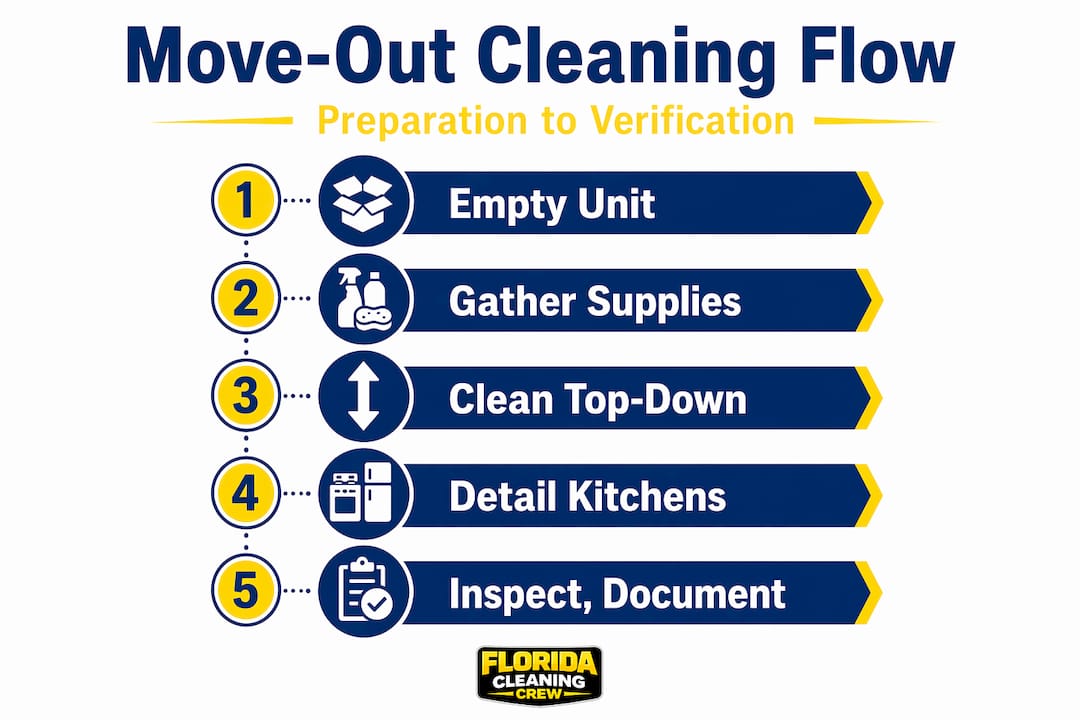
The step-by-step move-out cleaning method
The biggest mistake in post-tenant cleaning is working randomly, bouncing between rooms and areas without a system. The result is always the same: you clean the counters, then knock dust off the ceiling fan onto them. A top-to-bottom cleaning sequence eliminates that problem entirely.
How to sequence the cleaning correctly
Follow this order for each room before moving on:
- Dust all ceiling fixtures, fans, light covers, and vents. Use an extendable duster or vacuum attachment to pull dust down, not just smear it around.
- Wipe down walls, door frames, and baseboards. Look for scuffs, greasy fingerprints, and any marks near light switches.
- Clean all windows, blinds, and window wells. Window wells trap dead insects and debris that are easy to miss.
- Tackle all surface areas including countertops, shelves, and built-in furniture.
- Clean appliances and fixtures last within each room.
- Vacuum and mop the floors only after everything above has been completed.
This sequence is what separates a truly clean unit from one that just looks clean until you look closer.
Kitchen cleaning: the most labor-intensive room
The kitchen deserves its own dedicated effort. Start by vacuuming inside drawers and cabinets before wiping them down. This prevents pushing crumbs and grit into the corners with a cloth.
For the oven, use a commercial oven cleaner or a baking soda paste left overnight to break down baked-on grease. The range hood and exhaust filters are where most landlords fall short. Grease-coated kitchen hoods are a top red flag during property inspections and can indicate a broader sanitation concern. Remove the filters and soak them in hot water mixed with dish soap and degreaser for at least 30 minutes.
Refrigerators need to be emptied, unplugged, wiped inside and out, and left with the doors propped open. Check the coils at the back if accessible. Dishwasher interiors collect standing water residue and food particles in the filter at the bottom.
Bathroom cleaning: the room that makes or breaks an inspection
Bathrooms should be treated as a separate project. Hard water stains on fixtures, mold in grout lines, and soap scum on glass are the most common failure points. A wet pumice stone removes hard water stains from toilets and porcelain shower pans far more effectively than chemical cleaners alone.
For grout mold, apply a bleach-based spray and let it sit for 10 to 15 minutes before scrubbing with a stiff grout brush. Do not skip behind the toilet and around the base. Those areas accumulate mineral deposits and residue that are clearly visible during a walkthrough.
Living areas, bedrooms, and commonly missed spots
Here is a quick reference table for areas landlords most commonly miss:
| Area | What to check | Best method |
|---|---|---|
| HVAC vents | Dust buildup and filter condition | Vacuum, then replace filter if needed |
| Ceiling fan blades | Thick dust layers on top | Damp microfiber cloth |
| Window wells and tracks | Dead bugs, debris, mold | Vacuum, then wipe with diluted bleach |
| Closet shelves and rods | Dust, hair, forgotten items | Wipe down and vacuum floor corners |
| Baseboards | Scuffs, grime, hair | Microfiber cloth with all-purpose cleaner |
| Light fixtures | Dead bugs inside covers | Remove cover, wipe, reinstall |
Replacing burned-out light bulbs and HVAC filters is often a lease requirement and is noted during formal inspections. These small items create a bad first impression and can be flagged during a walkthrough even if everything else is spotless.
Pro Tip: For carpets with pet odors or staining, an enzyme-based cleaner applied the night before and extracted the next morning works better than any surface spray. Apply generously, let it absorb, and then extract.
If you want a deeper breakdown of deep cleaning steps that apply across all unit types, that resource walks through the full room-by-room process in detail.
Inspection-focused priorities and problem areas
Understanding why you should inspect cleaning after tenant move-out changes how you prioritize your effort. Inspections are not random. Landlords and property managers focus on specific areas because those are the ones that generate real costs if neglected.
Kitchens and bathrooms receive the most scrutiny because they are the hardest to bring back once they fall into serious disrepair. Mold in grout, corroded fixture finishes, and grease buildup in appliances can require professional remediation rather than a simple clean.
High-risk versus low-risk areas
| Area | Risk level | Why it matters |
|---|---|---|
| Oven and range hood | High | Grease is a fire risk and a top deduction trigger |
| Bathroom grout and caulk | High | Mold causes health concerns and is expensive to re-caulk |
| Carpet stains | Medium to high | May require professional extraction or full replacement |
| Walls and nail holes | Medium | Small holes are normal wear; large patches require repair |
| Window tracks | Low to medium | Dirty but rarely causes deductions unless very neglected |
| Light switches and outlet covers | Low | Easy to clean but noted if grimy during inspections |
For walls, a small amount of spackling paste and a damp sponge handles most nail holes effectively. Sand lightly after it dries, then touch up with matching paint. Keep a small can of the unit’s wall color on hand for exactly this purpose.
Pro Tip: Take your own pre-cleaning inspection photos before you or your team starts. Document every stain, mark, hole, and damaged item. This creates a clear before-and-after record that supports any deduction claims.
For a focused look at turnover cleaning for rentals, including kitchen and bathroom protocols specific to Tampa Bay properties, that guide covers the most common scenarios you’ll face between tenants.
Documentation and verification after cleaning
Treat the post-cleaning stage like evidence management. Once the unit is clean, your job is to prove it. Dated before-and-after photos are the most powerful tool you have if a tenant disputes condition claims or challenges a deduction.
Here is a simple documentation process to follow after every move-out clean:
- Photograph every room from multiple angles immediately after cleaning is complete. Include close-ups of previously flagged problem areas.
- Record a short video walkthrough of the entire unit. Video captures context that still photos sometimes miss, like odors described in narration or general light conditions.
- Save all cleaning receipts, whether for professional services or supplies purchased. Cleaning receipts demonstrate good faith effort and can prevent disputes from escalating.
- Email copies of all photos and videos to yourself or store them in a cloud folder with an automatic timestamp. This creates a verifiable record that is difficult to challenge.
- Conduct or request a joint walkthrough with the tenant if possible before finalizing deposit decisions. This gives both parties the opportunity to see the unit’s condition in person.
Pro Tip: Keep a dedicated folder per property with move-in photos, move-out photos, and any repair or cleaning receipts. If a dispute goes to small claims court in Hillsborough County or Pinellas County, organized records close cases quickly.
Troubleshooting common move-out cleaning challenges
Even with a solid plan, some situations require extra attention. Here is how to handle the most common problems efficiently:
- Stubborn oven grease: Apply oven cleaner and seal the oven door with plastic wrap overnight to trap moisture and accelerate the breakdown. The next day, the residue wipes off with far less scrubbing.
- Bathroom mold that keeps coming back: Surface mold on caulk usually means the caulk itself is compromised. Remove and replace the caulk rather than repeatedly bleaching over it. Fresh caulk takes less than 30 minutes to apply and looks brand new.
- Pet odor in carpets or subfloor: If an enzyme cleaner does not fully resolve the smell, the padding underneath may be saturated. In Tampa Bay’s humidity, this is more common than landlords expect. Replacing padding is often more cost-effective than repeated treatments.
- Hard water stains on shower glass: A paste made from cream of tartar and hydrogen peroxide, applied and left for 20 minutes, cuts through mineral deposits that standard bathroom cleaners leave behind.
- Missed spots in a rush clean: Work from a printed checklist, room by room, and check off each item before moving to the next. This sounds basic, but most missed spots come from cleaning by memory rather than by list.
Pro Tip: If you manage more than two or three units in the Tampa Bay area, consider building a relationship with a local cleaning company for move-out turns. A reliable professional team typically completes a full unit in the same time it takes one person to do half the job alone.
For professional window cleaning during turnovers, including blinds and tracks, check out pro-level window techniques that make a real difference in how a unit presents to new tenants.
My honest take on move-out cleaning after 15 years
I’ve watched countless landlords walk into a vacant unit, do a quick scan, and convince themselves it’s “mostly fine.” Then the new tenant moves in, finds mold behind the refrigerator, a crusty oven, and stained grout, and suddenly you’re managing a complaint instead of a tenancy.
The cleaning complexity in a rental unit after occupied tenancy genuinely surprises most first-time and even experienced landlords. It’s not the same as cleaning your own home. The kitchen has been used by someone else’s cooking habits for months or years. The bathroom grout has absorbed soap scum and mineral deposits from a stranger’s daily routine. The walls have absorbed cooking smells, cigarette residue in some cases, and accumulated fingerprints at every door frame.
What I’ve found works is treating move-out cleaning like a project with phases: preparation, execution, and verification. Skipping any phase creates problems in another. Landlords who skip documentation, for example, often have no recourse when a tenant disputes a deduction, even when the cleaning cost was clearly justified.
The other thing I’ve learned is that structured checklists pay for themselves within a single dispute. I’ve seen landlords in Tampa Bay recover full cleaning costs in small claims court simply because they had timestamped photos, receipts, and a completed checklist. The landlord who “did it from memory” lost the same argument.
Good documentation is not paranoia. It’s the difference between getting paid for legitimate expenses and absorbing them yourself.
— Matt
Let Floridacc handle your next move-out clean

Floridacc provides professional move-out cleaning services across Tampa Bay, serving landlords and property managers in Tampa, St. Petersburg, and Clearwater. Their team works from detailed room-by-room checklists, uses eco-friendly and commercial-grade products, and delivers units that are genuinely ready for new tenants, not just surface-level presentable.
For landlords managing multiple properties or tight turnover timelines, having a licensed, insured local team on call makes a real difference. Floridacc offers flexible scheduling, free estimates, and the kind of thorough cleaning that holds up under inspection. If you’re preparing a unit now or planning ahead for your next vacancy, reaching out to Floridacc early gives you the best shot at availability, especially during Tampa Bay’s busy rental season.
FAQ
What is the correct order to clean a vacant rental unit?
Start at the top of each room by dusting ceiling fixtures, fans, and vents, then work down through walls, surfaces, and appliances before finishing with floors. This top-to-bottom approach prevents dust from resettling on areas you’ve already cleaned.
Which areas cause the most deposit deductions after a tenant moves out?
Kitchens and bathrooms are the two areas most likely to trigger deductions. Grease buildup in ovens and range hoods and mold in bathroom grout are the most common specific issues flagged during post-tenant inspections.
How should landlords document cleaning after a tenant move-out?
Take timestamped photos and video of every room immediately after cleaning, save all cleaning receipts, and store copies in a cloud folder. Dated photo documentation provides objective evidence that significantly reduces the risk of a successful tenant dispute.
When should you schedule professional cleaning after a tenant moves out?
Book professional cleaning services 2 to 3 weeks before the expected move-out date, particularly at month-end when demand peaks. Waiting until the last minute in markets like Tampa Bay risks poor availability, especially during summer lease turnovers.
Do you need to replace HVAC filters and light bulbs during a move-out clean?
Yes. Many leases require tenants to replace HVAC filters and burned-out bulbs before vacating, and property inspectors routinely check both. Handling these items during the move-out clean protects your ability to re-lease the unit quickly and avoids inspection flags.